Sunday, July 27, 2008

Tying Pointe Shoe Ribbons


Ballerina Barbie has her pointe shoes tied incorrectly. It drives me crazy. You'd think the people at Mattel would have done a little research on this first but they didn't. Ballet teachers everywhere are faced with the task of convincing young girls that pointe shoe ribbons are not supposed to be laced up to your knees and tied in pretty little bows!


How to put your shoes on correctly and tie your ribbons:

  1. After putting your pads on hold your pointe shoe evenly with both hands and pull it on your foot making sure you go under any elastic you've sewn on your shoe.
  2. If you have a drawstring, you'll need to tie a knot and cut the ends of the drawstring so you have only about an inch on both sides. Before you cut, make sure you do not have your drawstrings pulled too tight. They should never dig into the back of your heel. Tuck the ends inside the box of the shoe.
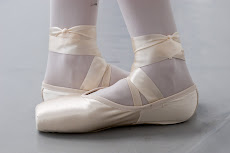
  3. With your foot flat on the floor, begin with the inside ribbon and wrap it across the front of your ankle and around the ankle, not the calf, like Ballerina Barbie! Hold it securely.
  4. Repeat the process with the outside ribbon being sure to overlap the piece that lies across your ankle. Both ends should now be on the inside of your ankle.
  5. Tie a double knot being careful to tie the knot so it rests on the inside soft part of your ankle, not on the Achilles tendon in the back of your ankle and not on the front or outside your ankle.
  6. Now you want to make sure you leave enough ribbon but not too much. If you are designating a right and left shoe, cut the ends of your ribbons so that there is about 1 1/2 inches of ribbon after the knot. Tuck the ends under the knot.
  7. If you are alternating shoes, you will want to lightly mark each of your ribbons in pencil on the inside before you cut them. Put the same shoe on the other foot and mark them again. Cut on the mark closest to the end on each ribbon so that you will be able to alternate your shoes. (The ends will not be exactly the same length after the knot.)

Note: Don't designate a right and left shoe unless you need to to accommodate differences in your feet. Your shoes will last longer if you alternate them.

Saturday, July 26, 2008

Caring for Your Shoes

Pointe shoes are expensive - probably because most of them are still made by hand. If you'll develop some good habits when you first begin pointe, you'll save a lot of money through the years because by taking care of your shoes, you can extend their life.

  • Do not leave your pointe shoes stuffed in your dance bag. Over time your dance bag will smell like road kill and you will be replacing your shoes more often! Moisture breaks down the glue in pointe shoes and softens them so after class be sure to take your pads out and let your shoes air dry. Put them somewhere where you can leave them for a couple of days.
  • When they thoroughly dry, before you toss them back into your dance bag, fold the heel in and then the sides and wrap your ribbons neatly around the shank, tucking the ends under so the ribbons don't get tangled with everything else in your dance bag and get pulled off. Note: Even if you keep your pointe shoes in a mesh bag, you still need to take them out after class and let them dry well.
  • For those of you who are more advanced and take pointe daily, it's best to buy several pairs of shoes and rotate them. While this is more expensive at the time you make your purchase, it's less expensive in the long run.

Wednesday, July 23, 2008

Personal Preferences

m
All pointe teachers have their personal preferences for the way they like things done. We have opinions on everything from where to place elastic on pointe shoes to what types of shoes and pads to use. As you take classes with different teachers, be open to their suggestions and keep trying different things until you find what works best for you.

That said, here are my preferences:

  1. Use Ouch Pouch pads rather than thick gel pads or other types of padding inside your shoes.
  2. Sew one strap of elastic across the top of your foot unless you have very narrow heels. If they slip off your heels even though they fit well every other way, then refer to the post "Sewing Elastic on Your Shoes". The reason I like one strap across the top of your foot is because it snugs the shoe up slightly to your arch and if your ribbons loosen on stage, you can still dance. You'll be really embarrassed but at least your shoes will stay on your feet! Tip: It is always a good idea to take a few stitches through your ribbon at the knot so the knot doesn't come untied when you're performing.
  3. Paint the platform of your pointe shoes with clear nail polish. When you first dance in your shoes, there is very little resistance between the platform of your shoe and the floor. The clear polish acts as a rosin of sorts. (It soaks into the satin and makes it last longer too.) Try different types of polish. Base coat polish is usually thicker and better than top coat polish. Although our studio always has a rosin box available, we have been asked to perform places that don't allow rosin on their stage floor and this truly does help!
  4. Try Russian Pointe pointe shoes. I like them. I like the way they look and the way they wear. Not everyone has a foot suited to a Russian shoe but if you find a model that fits your foot well, give them a try!
  5. Use regular ribbon or ribbon with an insert of elastic - not the elastic ribbon. To me, it feels more stable. I don't like the stretchiness of the solid elastic ribbon.

Sunday, July 13, 2008

Protective Padding

mmm
Pointe shoes are not comfortable. Even with padding pointe shoes hurt when you've been working in them for awhile! Fortunately, most pointe teachers do not insist on their students using absolutely no padding at all in their shoes. The argument that supports not using padding is that the padding prevents you from feeling the floor well thus giving you less control in the shoes.
.
There are several types of padding on the market today that help dancers avoid blisters, reduce the discomfort that comes along with with wearing pointe shoes and still enable them to work well in the shoes. Some are better than others. Given the choice between lamb's wool, gel pads, foam pads and fur-lined pads, I recommend a thin gel pad such as the Ouch Pouch brand. Ouch Pouch makes a really nice gel pad that greatly reduces the discomfort associated with working in pointe shoes yet still allows your toes to feel the floor. Using too much padding such as too thick a gel pad can, as described above, cause you to be less stable on pointe by prohibiting you from feeling the floor.

There are alternatives to using pads to reduce discomfort and or blisters. Many dancers simply wrap their toes in paper. Others opt for taping their toes by individually wrapping each toe in a Band Aid or toe tape. These methods claim to not only help prevent blisters but also to develop calluses.

Often dancers use talcum powder on their toes to help prevent blisters. The talcum powder helps by absorbing moisture. This is usually done in conjunction with pads and/or taping the toes. (It also helps your feet smell better!) If you choose to use talcum powder, be sure to keep the powder away from the studio floor or stage. It will make the floor slippery.

Thursday, July 10, 2008

Sewing Elastic on Your Shoes

Technically, a great fitting shoe should need no elastic. The problem is, few of us have two feet exactly the same or the luxury of having custom pointe shoes made. Most people opt to sew on some elastic if for no other reason than to prevent an untied shoe from flying off into the audience! Here are a few options for elastic placement:

  • If your shoes fit well but you simply want some added security, sew one strip of elastic across the arch of your foot as you would for a single strap of elastic on a ballet slipper. (See photo)
  • If your shoe tends to slip off your heel at times, sew two strips of elastic on either side of the back seam and then cross the two pieces to make an "X" over your foot. The other ends are then sewn to the inside of the shoe close to the waist seam.
  • Another option is to sew on one piece of elastic and create a loop by securing one end to one side of the back seam and the other end to the other side of the back seam.


Note: If you have narrow heels you can sew the elastic to the inside of the back of your shoe on either side of the back seam; however, you never want the elastic to rub against your Achilles tendon. Unless it's a little roomy around your heel, it's recommended that you sew the elastic to the outside of the shoe.

What About Ribbon?

.
Pointe shoes require 2.5 yards of ribbon. Ribbon comes in various shades of pink so be sure to purchase the ribbon that best matches the color of your shoes. Besides regular ribbon, there is ribbon that is actually elastic and there is ribbon with an elastic piece sewn into it. For beginning students I recommend regular ribbon. Take a look at the shoes shown to the left. Use this photograph as a guide for your ribbon placement.
  1. Cut your ribbon into 4 pieces of equal length.
  2. Fold 1/2" of one end of the ribbon under.
  3. Sew the folded end of your ribbon to your shoe tilting the ribbon slightly forward. This will help the ribbon lay flat over your instep. Repeat with the remaining 3 pieces.
  4. Trim your ribbons so there is no more than an inch and a half left of ribbon after you tie your knot. Be careful and lightly mark your ribbons before cutting being sure to try each shoe on both feet before you cut the ribbon. Unless you have one foot significantly bigger than the other, you will want to alternate your shoes so that they last longer.
  5. Strike a match and run the very end of your ribbon through the flame quickly to seal the ends of your ribbons so they don't fray.

Wednesday, July 9, 2008

Before Your First Pointe Shoe Fitting

Before your first pointe shoe fitting:

  1. Be sure you cut your toenails so that they reach only to the tips of your toes. Cut them straight across and only slightly round the corners.
  2. Know the size and width of your street shoe. This information will help give the fitter a good starting point for sizing you.

Note: It is wise to go for your fitting after a dance class because during the day, your feet expand some.

At the Fitting:

  1. The fitter will want to see your bare feet before she begins to fit you. Although tights are worn for the fitting, a good fitter will observe your toes and the shape of your foot first before making any recommendations. (Be sure to bring your tights with you unless you're planning to buy a pair there.)
  2. Know the size and width of your street shoe. This information will give the fitter a good starting pointe for sizing you.
  3. Do not be concerned if you seem to be trying on pointe shoes 1-3 times shorter or a size wider than your regular shoe. Pointe shoes should fit your feet like gloves do your hands.

Do They Fit?

  1. Demi-plie in the shoe and make sure your arch has room for expansion.
  2. Releve in the shoe. If the shoe slides off easily, try going down a size in length.
  3. Pointe shoes should hold your toes snugly, but not so snugly that they are bunched together or bent.
  4. There shouldn't be any excess room between the drawstring and the top of the foot or at the heel.
  5. The vamp should be long enough to cover the joint at the base of your big toe.
  6. When you stand in releve, you should only be able to pinch one thumb's width of satin.

Do not dance in your shoes before they have been seen on your feet by your teacher. Wait for your teacher's approval before you sew on your ribbons. Shoes that don't fit correctly cannot be returned if they have gotten dirty or have been altered in any way.

Where to Buy Pointe Shoes

.
For your first pair of pointe shoes I recommend you go to Dance Outfitters. They carry a large variety of pointe shoes, ribbon and pads for your dancing comfort. Dance Outfitters is located at 109 Volvo Parkway. Their phone number is 757-548-6688. Be sure to mention that you are a student from the Academie de Ballet and receive a 15% discount on all your purchases.

Tuesday, July 8, 2008

Are You Ready for Pointe?

It is very important that you are strong enough for pointe shoes before you begin dancing in them. It's possible to hurt or even permanently injure yourself, if you are not. Here are a few things teachers often look for to determine if you're ready for pointe:

  1. When you grand plie in 5th position, your body should be properly aligned. You should be able to do a grand plie without wobbling or altering the position of your feet.

  2. You should be able to releve in retire and hold a solid balance. The knee on your standing leg must be pulled up and both legs must be completely turned out.

  3. When doing echappe en releve, the echappe should be solid and well placed in the releve position.

  4. If your body is soft and floppy, not pulled up and well placed with your center strongly held, then you are not ready for pointe work.

In addition, the shape of your foot is considered. God designed each one of us differently. Some students have a great deal of trouble getting up in their pointe shoes while others make it look effortless. Quite often, the only difference is their feet.

To help determine if your feet will be able to push you up and over the platform of a pointe shoe:

  1. Sit up as tall as you can and stretch your legs out in front of you about one foot apart making sure your knees stay straight.

  2. With your feet parallel to the floor, pointe as hard as you can and then have someone measure from your ankle bone to the floor and then from your big toe joint to the floor.

  3. If the measurement is greater from the big toe joint to the floor than the measurement from your ankle bone to the floor then you may have a difficult time pushing up to the platform of the pointe shoe. If the measurement is greater from your ankle bone to the floor than your big toe joint to the floor than you should be able to get up pretty easily in a shoe. If they are the same in measurement, getting up in a pointe shoe will most likely not be a big problem for you.